Overview
Windward Sidekick allows customers to be able to look up inventory, and build orders.
A Windward Learning Academy course on Sidekick is available to learn more about its operation.
If you want to test out Sidekick use the development sandbox and your @windwardonline.onmicrosoft.com credentials.
The back-end technology operates on the same E-commerce Staging (ECS) platform as Woo-Commerce, AVB & SDK Integrations. It is administrated using the Deployment Web App and interacts with WindwardConnect service.
Although WindwardConnect is available in older versions of System Five, Sidekick will require:
- System Five Version 7.0
- .Net Framework v 4.7.2xxx or greater for WindwardConnect
- ODBC Database DSN
- Actian Zen 14 or 15
- EdgeView2 installed on any workstation needing to access Ecommerce Staging
Pre-Setup and engage Cloud Operations
If not configured, create an ODBC Database DSN and configure this in System Five Setup Wizard under Pervasive.SQL Databases. The expected time for this configuration step can take 10-15 minutes.
Check some inventory for "Export to eCommerce" so there is something to view in Sidekick once it is set up. An enhancement rolled out 2024-05-28 will not make this a requirement. After this inventory change, all inventory will be made available in Sidekick for inventory counting operations.

Cloud Operations will need to create a database connection in our Azure Server. They will require the following information. The expected time for this step can take 1hr and 15 minutes or more.
From the System Five About menu, gather the following information.
- Customer Name:
- Server Name:
- DSN Database Name (LIVE or TRAINING):
- Data Directory (eg: C:\Windward\System5\Data):
- License Codes Serial Number:
- Customer Record Unique Number (RWW) from Real Windward customer record in RDS or can be found by viewing the "Real WW Unique #" found in more company information in FreshDesk:
- For System Five on Cloud customers order .NET framework be 4.7.2xxx or greater
- For System Five on Cloud customers order EdgeView2 to be installed and enrolled in "EdgeWebViewGroup" group policy. This will avoid a blank screen experience when multiple users access ECS.
Email this information to Ina or [email protected] for Deployment App database creation.
Upgrade or Install .NET for On-Prem Server (Customer Care)
From the server check if .Net Framework is running in a supported version (.Net Framework v 4.7.2xxx or greater). The expected time for this step can take (xx minutes)
Run CMD as an Administrator and input the command below to get the currently running version
reg query "HKEY_LOCAL_MACHINE\SOFTWARE\Microsoft\NET Framework Setup\NDP\v4\full" /v version |
HKEY_LOCAL_MACHINE\SOFTWARE\Microsoft\NET Framework Setup\NDP\v4\full
    version    REG_SZ    4.8.09032
Download the latest release from the link below if you need to update. Note that installing the .net framework will require a restart to take effect. https://dotnet.microsoft.com/download/dotnet-framework/net48
Setup WindwardConnect and Deployment App (Customer Care)
The expected time for this configuration step can take (xx minutes). (awaiting actual results)
1. For the setup to begin, the Database must already be created in the Deployment App by Cloud Operations.
Take note of the "Tenant ID".

Now, add the word "queueWindwardConnectProduction" in front of the TenantId. So it should look like below. Keep it because you will need it later.
| queueWindwardConnectProductionbe0e3394-e478-42d5-bdea-394a211486f3 |
2. Set up WindwardConnect on the server and Deploy in the Deployment App.
- See this Article to configure WindwardConnect and enable Record State Tracking in System Five.
- Review Troubleshooting WindwardConnect if the service is not starting or communicating.
3. Deploy Windward Sidekick in the Deployment App
- Once you have WindwardConnect setup and deployed
- Go back to the Deployment App
- Select the "Deployment Integration" button
- Expand the company name
- Select the Tenant (you're only going to be seeing either Trianin for Live, depending on what you are setting up)
- Click the arrow down from the Deployment Integration button
- Select S5 Sidekick App

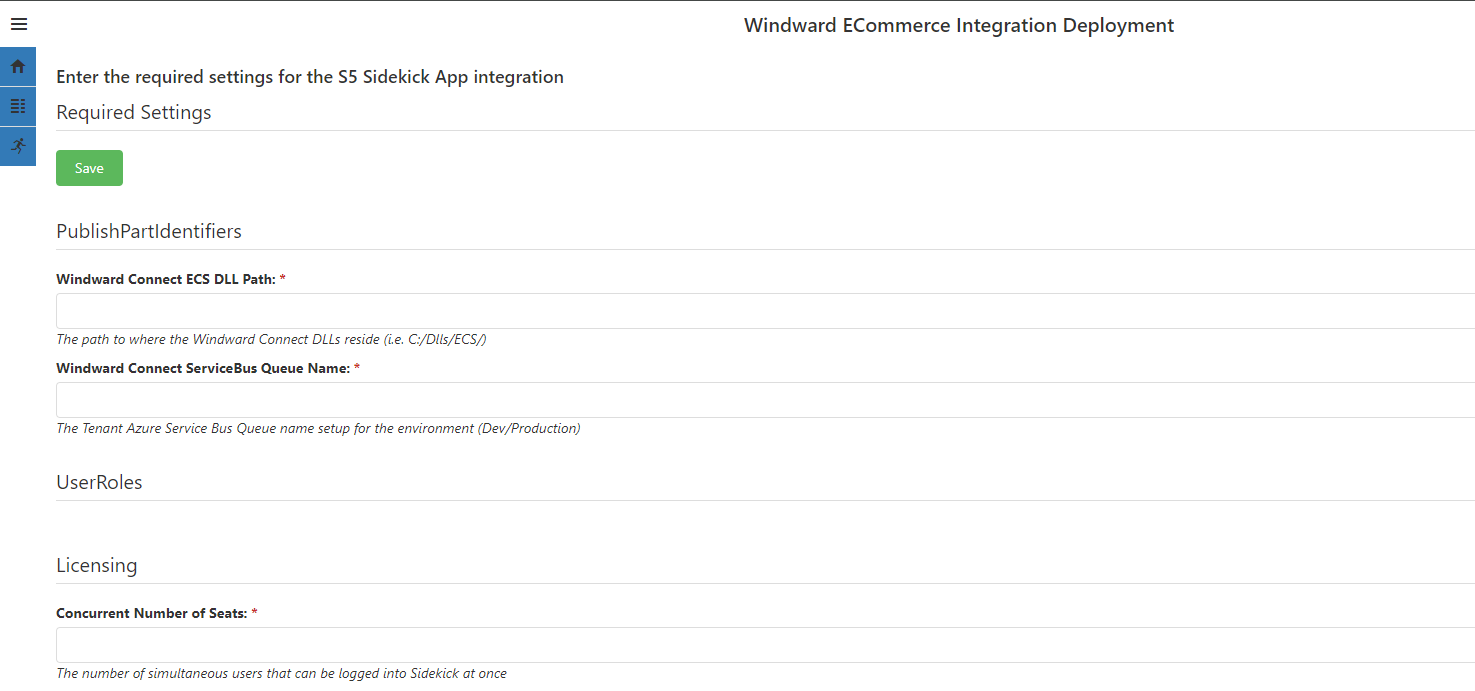
8. Provide the S5 Sidekick App Integration information
DLL path must use FORWARD slashes instead of BACKSLASHES
Servicebusqueuename
Licensing which is the expected number of users that will be using the Sidekick app typically 1-5 (this will not limit the user at this time)
9. Then click Save button.
10. Click the Deploy button.
Confirm Services are Successfully operating in ECS (Customer Care)
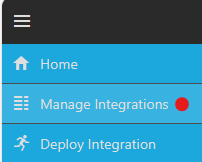
1. Administrate using the Deployment Web App and validate services are successfully operating by clicking on menu option to "Manage Integrations".
2. Filter the list by the customer you want to find.

3. Click Live or Training in the DataSet Type.
4. Click the "Manage Integration" button.

5. If you see Failed under the Last Success column you may need to investigate why. Generally, all services should be running and indicate Successful under the Last Run Success.
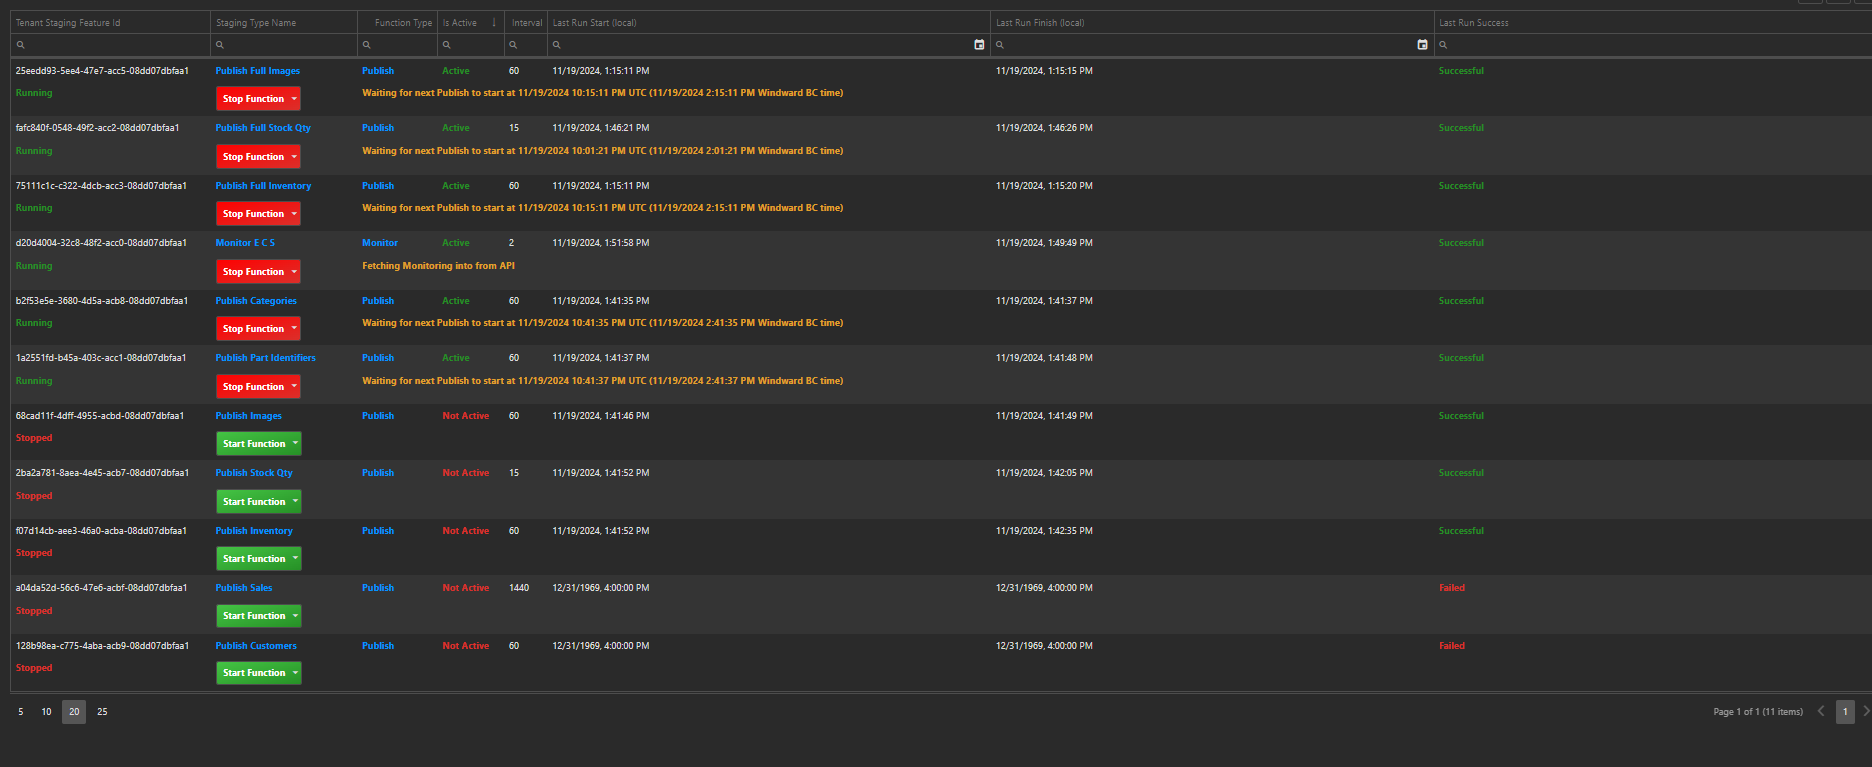
Publish Inventory = ECommerce & Old Sidekick inventory coupled to Export to ECommerce
Publish Full Inventory = New Sidekick full inventory
- WindwardConnect settings such as server name or the DSN
- Deployment Application Settings such as DLL path, Servicebusqueuename.
6. You can also enter a note by choosing "Change Notes" from the Start Function drop-down menu. This is useful information for the next technician who may review the settings if we disabled a feature on customer request.
Confirm Sidekick Operation
Let the customer launch Sidekick on their device or browser and sign in using their Microsoft Login Windward Academy credentials. See also How to Sign into Sidekick.
- In a browser navigate to https://sidekick.windwardsoftware.com/
- In the top right click on "Not signed in".
- Have the customer enter their username@apps.windwardoncloud.com credentials
- Search for an item in part find. If it displays, the upload is working properly.
- Sign in to System 5 and confirm that user is able to login to Sidekick using E-comm staging.
Troubleshooting
- If inventory uploading is showing as failed, ensure Use Record State Tracking is configured in the Setup Wizard.

- If the loading of categories takes minutes long. There is no inventory in System Five selected with the "Export to eCommerce" checkbox on the extra tab on the inventory report.
- If receiving "An error occurred requesting the Windward Connect Test" in the deployment manager.
 Ensure the server running WindwardConnect is .NET 4.7.2xxx or greater
- Ensure the Real Windward Unique, Tenant ID, DLL path and Servicebusqueuename are correct and entered into the right places.
- Ensure WindwardConnect is running and healthy as a service. You may need to review logs to discover why it is not syncing.
- If orders are not importing with missing lines or experiencing record locks after import. Check the Order Import configuration. The Tender Type will need setting; Subtotal adjustment part can not be "DEFAULT"; Import Order System Five Invoice Type must not be "C". Additional technical detail in ticket 124445

Additional Technical Details
Perform normal Staging Core and Sidekick deployment for the tenant via the Deployment Web App
- This step can not be performed unless Cloud Ops has created the Staging database for the tenant dataset.
- If you receive a blank screen using these credentials you may not be provisioned or are using @windwardsoftware.com credentials.
Internal Transition documentation is available on SharePoint and should not be shared with a customer. Use for internal learning.
The Windward Sidekick dev ops documentation is available using your @windwardonline.onmicrosoft.com credentials.
Tenant Onboarding
- Ensure Tenant record exists in S5oCTenants table in RealWindward Azure Database for the company & create Tenant Staging Database (Cloud Ops)
- NEW for Sidekick - Ensure the ADGroupId field of the Tenant record is populated with the Azure AD Group Oid from the tenant's company group in the Windward on Cloud Apps B2C directory; If no AD group exists for the customer it would be created at this time. The groups and users to be used for the Sidekick login should likely already pre-exist for use with Windward Academy.
- The Azure Group Id selected must be from an AD group specifically for that Company's users. This Id value is used to provide the associated member user logins access to a specific company dataset so getting this wrong will give the users access to another customers data when running Sidekick.
i.e. If we're performing onboarding for the company Acme Inc., the Azure AD Group selected/created should be for Acme Inc. company and the users in the group should be only for that company.
- The Azure Group Id selected must be from an AD group specifically for that Company's users. This Id value is used to provide the associated member user logins access to a specific company dataset so getting this wrong will give the users access to another customers data when running Sidekick.
- NEW for Sidekick - Ensure the ADGroupId field of the Tenant record is populated with the Azure AD Group Oid from the tenant's company group in the Windward on Cloud Apps B2C directory; If no AD group exists for the customer it would be created at this time. The groups and users to be used for the Sidekick login should likely already pre-exist for use with Windward Academy.
- Perform standard Windward Connect Deployment for Staging.
- Perform normal Staging Core deployment for the tenant via the Deployment App
- Cloud ops will need to ensure the Staging database for the tenant dataset is created beforehand.
- Perform Sidekick deployment for the tenant via the Deployment App
This deployment adds a new Publish PartIdentifier tenant staging feature. This publishes barcode info from S5 to Staging as well as merges in the existing ECS S5 Inventory part/item/supplier part numbers in for performant part find lookups.
This step will also onboard the dataset selected for the company in the Azure RealWindward database UserTenantDataSets table. This record will allow for the users of the associated ADGroup selected above to be automatically onboarded by the Sidekick app when logging in the first time.
This step also provides configuration for the Licensing of the Sidekick application. In the Licensing section there is an option for the number of Concurrent users allowed to be logged in (Seats) and using the Sidekick at once. This is required and must be a number.

User Onboarding
Ensure each SideKick user for the tenant belongs to the same AD Group belonging to the tenant's company (as onboarded above)
A SideKick user can only belong to one AD group setup for SideKick access
- If the user has been previously onboarded to a different SideKick dataset (like the SideKick demo), development will be required to edit their UserTenantDataSet record to change it to point their dataset instead of the demo.
The User must fully log out of SideKick via the UI Logout option for the dataset used to change as the browser caches their credentials and won't reauthenticate to trigger the dataset change.
- If the user has been previously onboarded to a different SideKick dataset (like the SideKick demo), development will be required to edit their UserTenantDataSet record to change it to point their dataset instead of the demo.
The About screen showing User Id (MSALID) and Staging Dataset Id information for the user in SideKick can be accessed via clicking on the Version menu item in the submenu under the user name in the top right corner of the SideKick UI. This Dataset Id should match the tenants Dataset Id as seen in the Deployment App.

Configuration
System 5 Config
- Create or choose a Customer record to be used on the imported orders
- Note the customer unique for use in the configuration of the Sidekick App
- This customer is not to be left on the imported sidekick orders and will be manually replaced by the clerk with the actual customer for the order
Staging Web App Config
- Typical Staging Core setup for export settings (stock department, price schedules, etc.)
- Order import config
- Import orders as W or A (can't import as C type as there is no payment applied with Sidekick)
- Import orders as W or A (can't import as C type as there is no payment applied with Sidekick)
Sidekick App Config
- Under Manage -> Settings menu
- Choose a prefix for the imported System 5 Order Reference number (if desired, has a default value of S5S- i.e. S5S-0000001 would be the default first number used).
- Choose a starting order number for use in the System 5 Reference number (if not wanting to start from 0000001)
- Enter a valid customer unique from System 5. This placeholder Sidekick customer will be attached to all imported Sidekick Orders; it should be replaced with the actual customer via standard System 5 processes after import into System 5. (The Ecomm Order import requires a customer be attached to the order and Sidekick doesn't yet support customer creation / selection)
Features
- Part find / lookup capabilities
- Simple and Advanced part lookups
- Part display (From Part Find and Order Builder screens)
- Stock quantities (0 = All, plus individual departments if applicable)
- Images
- Use the < > arrows to navigate between multiple images (when applicable). Click on the image to see it larger in a popup window.
- Price levels (Regular and Sale)
- Order Builder
- Add / Remove Quantity
- Remove item
- Click on View Part (eye) icon to open dialog with Remove From Cart button or click the Quantity for a popup menu
- Enter specific quantity
Click on the quantity for a popup menu; you can select from a predefined value or choose Manual Entry to type in a custom value

Quantity popup menu
User Timeout
- User will be logged out after 10 minutes of inactivity, inactivity being:
- The local cart data hasn't been modified (items added/removed, quantity changed)
- No database calls via the back-end API has occurred
- An inactivity check is made every 30 seconds to see if the user has been idle for 10+ minutes
- If idle the user is changed to an anonymous user and redirected to the timeout page
- If idle the user is changed to an anonymous user and redirected to the timeout page
Limitations
No taxes are calculated
No price levels other than List (Price Level 0) are supported currently
- The final price level can be changed in S5 when the customer is changed however
- The price cannot be changed in Sidekick, but can be altered after import into S5 as normal
The customer cannot be attached to the order
Regular parts as well as Static and Tagalong (Parent item only) are supported; no other kit types are supported
Rentals are not supported
Pricing is displayed based on the currency (If S5 multicurrency in use) selected for import into Ecomm Staging. (Via Staging Web App Config)

No stock control is performed. The quantity shown is as of last Publish Stock Qty into Staging. This value will be reduced by orders sitting in Staging that aren't yet imported however.
Stock levels shown are a simplified calculation of In Stock - On Work Order - On Layaway


